Cambridge S-Series Preventative Maintenance Schedule
Proper maintenance is essential to keep your Cambridge S-Series heating unit running efficiently and prevent costly repairs. This blog outlines a preventative maintenance schedule for your unit. Depending on whether your unit has filter sections, inspections should be done two or four times a year. In this guide, we'll cover crucial tasks like checking air filters, greasing bearings, inspecting belts, and more. By following these steps, you'll extend the lifespan of your equipment and optimize its performance, reducing energy costs and minimizing downtime. Let's get started on maintaining your Cambridge S-Series unit.
*Full maintenance procedures and instructions may be found in the applicable product tech manual.
Suggested inspection Frequency:
- 2 times per year for units without filter sections
- 4 times per year for units with filter sections
Check the air filters: Clean these filters if necessary because dirty filters will reduce CFM and could damage the discharge air sensor.
Service the filters as needed based on the “loading” experienced. Clean filters typically start out with a pressure drop across the filters between 0.15 and 0.25” WC. Cleaning or replacement is generally required below the pressure drop increased by a factor of 4 times the initial clean value.
Grease the blower bearings: The grease should be evenly distributed around the race.
Heaters with 3 HP or smaller motors have permanently lubricated, double-shielded and double-sealed ball bearings which do not require additional lubrication. Heaters with 5 HP or larger motors require lubrication on intervals of 3 to 6 months. Use Duralube AW-2G, Goldplex (Lithplex HC 150 SMG), Shell Gadus S2V100 2 or Mobilith AW2 grease. Grease should be bearing quality and compatible to lithium bases thickener.
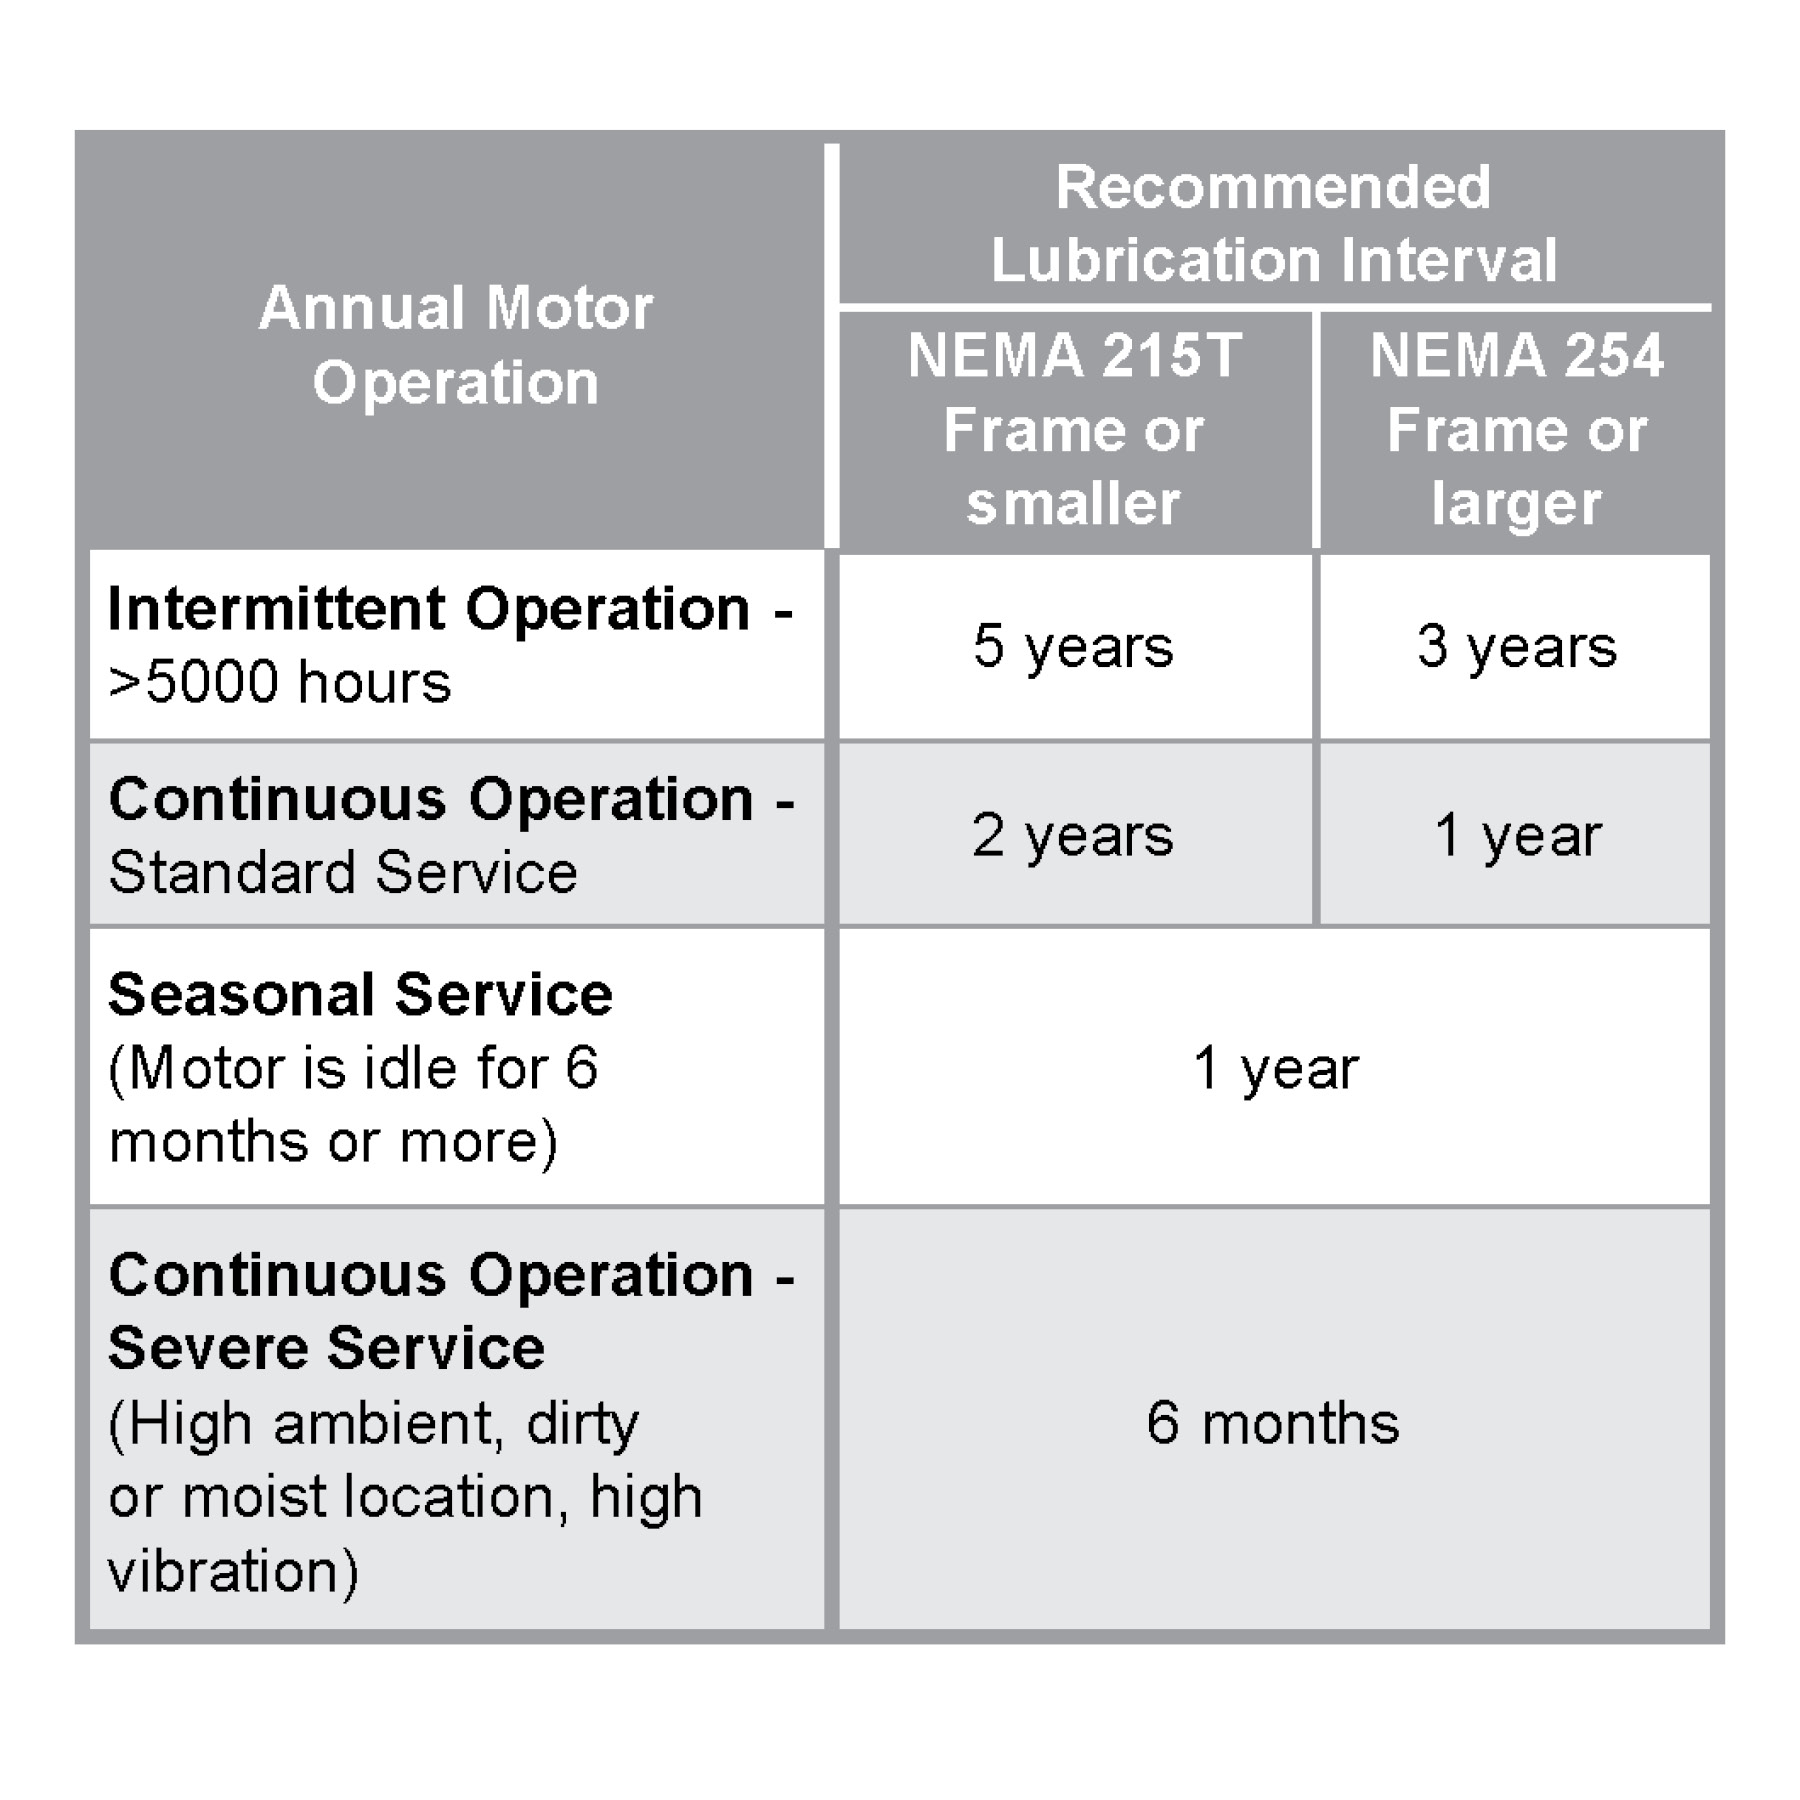
Grease the motor bearings: Do NOT use the standard bearing grease in the Baldor motor. This motor takes special grease.
Motors are pre-greased normally with Exxon Polyrex EM. Equivalent greases which are compatible with the Exxon Mobil lithium complex greases and electric motor polyurea greases per ASTM D6185. Follow the below schedule for your motor grease intervals.
Turn the disconnect switch off when performing service or maintenance functions.
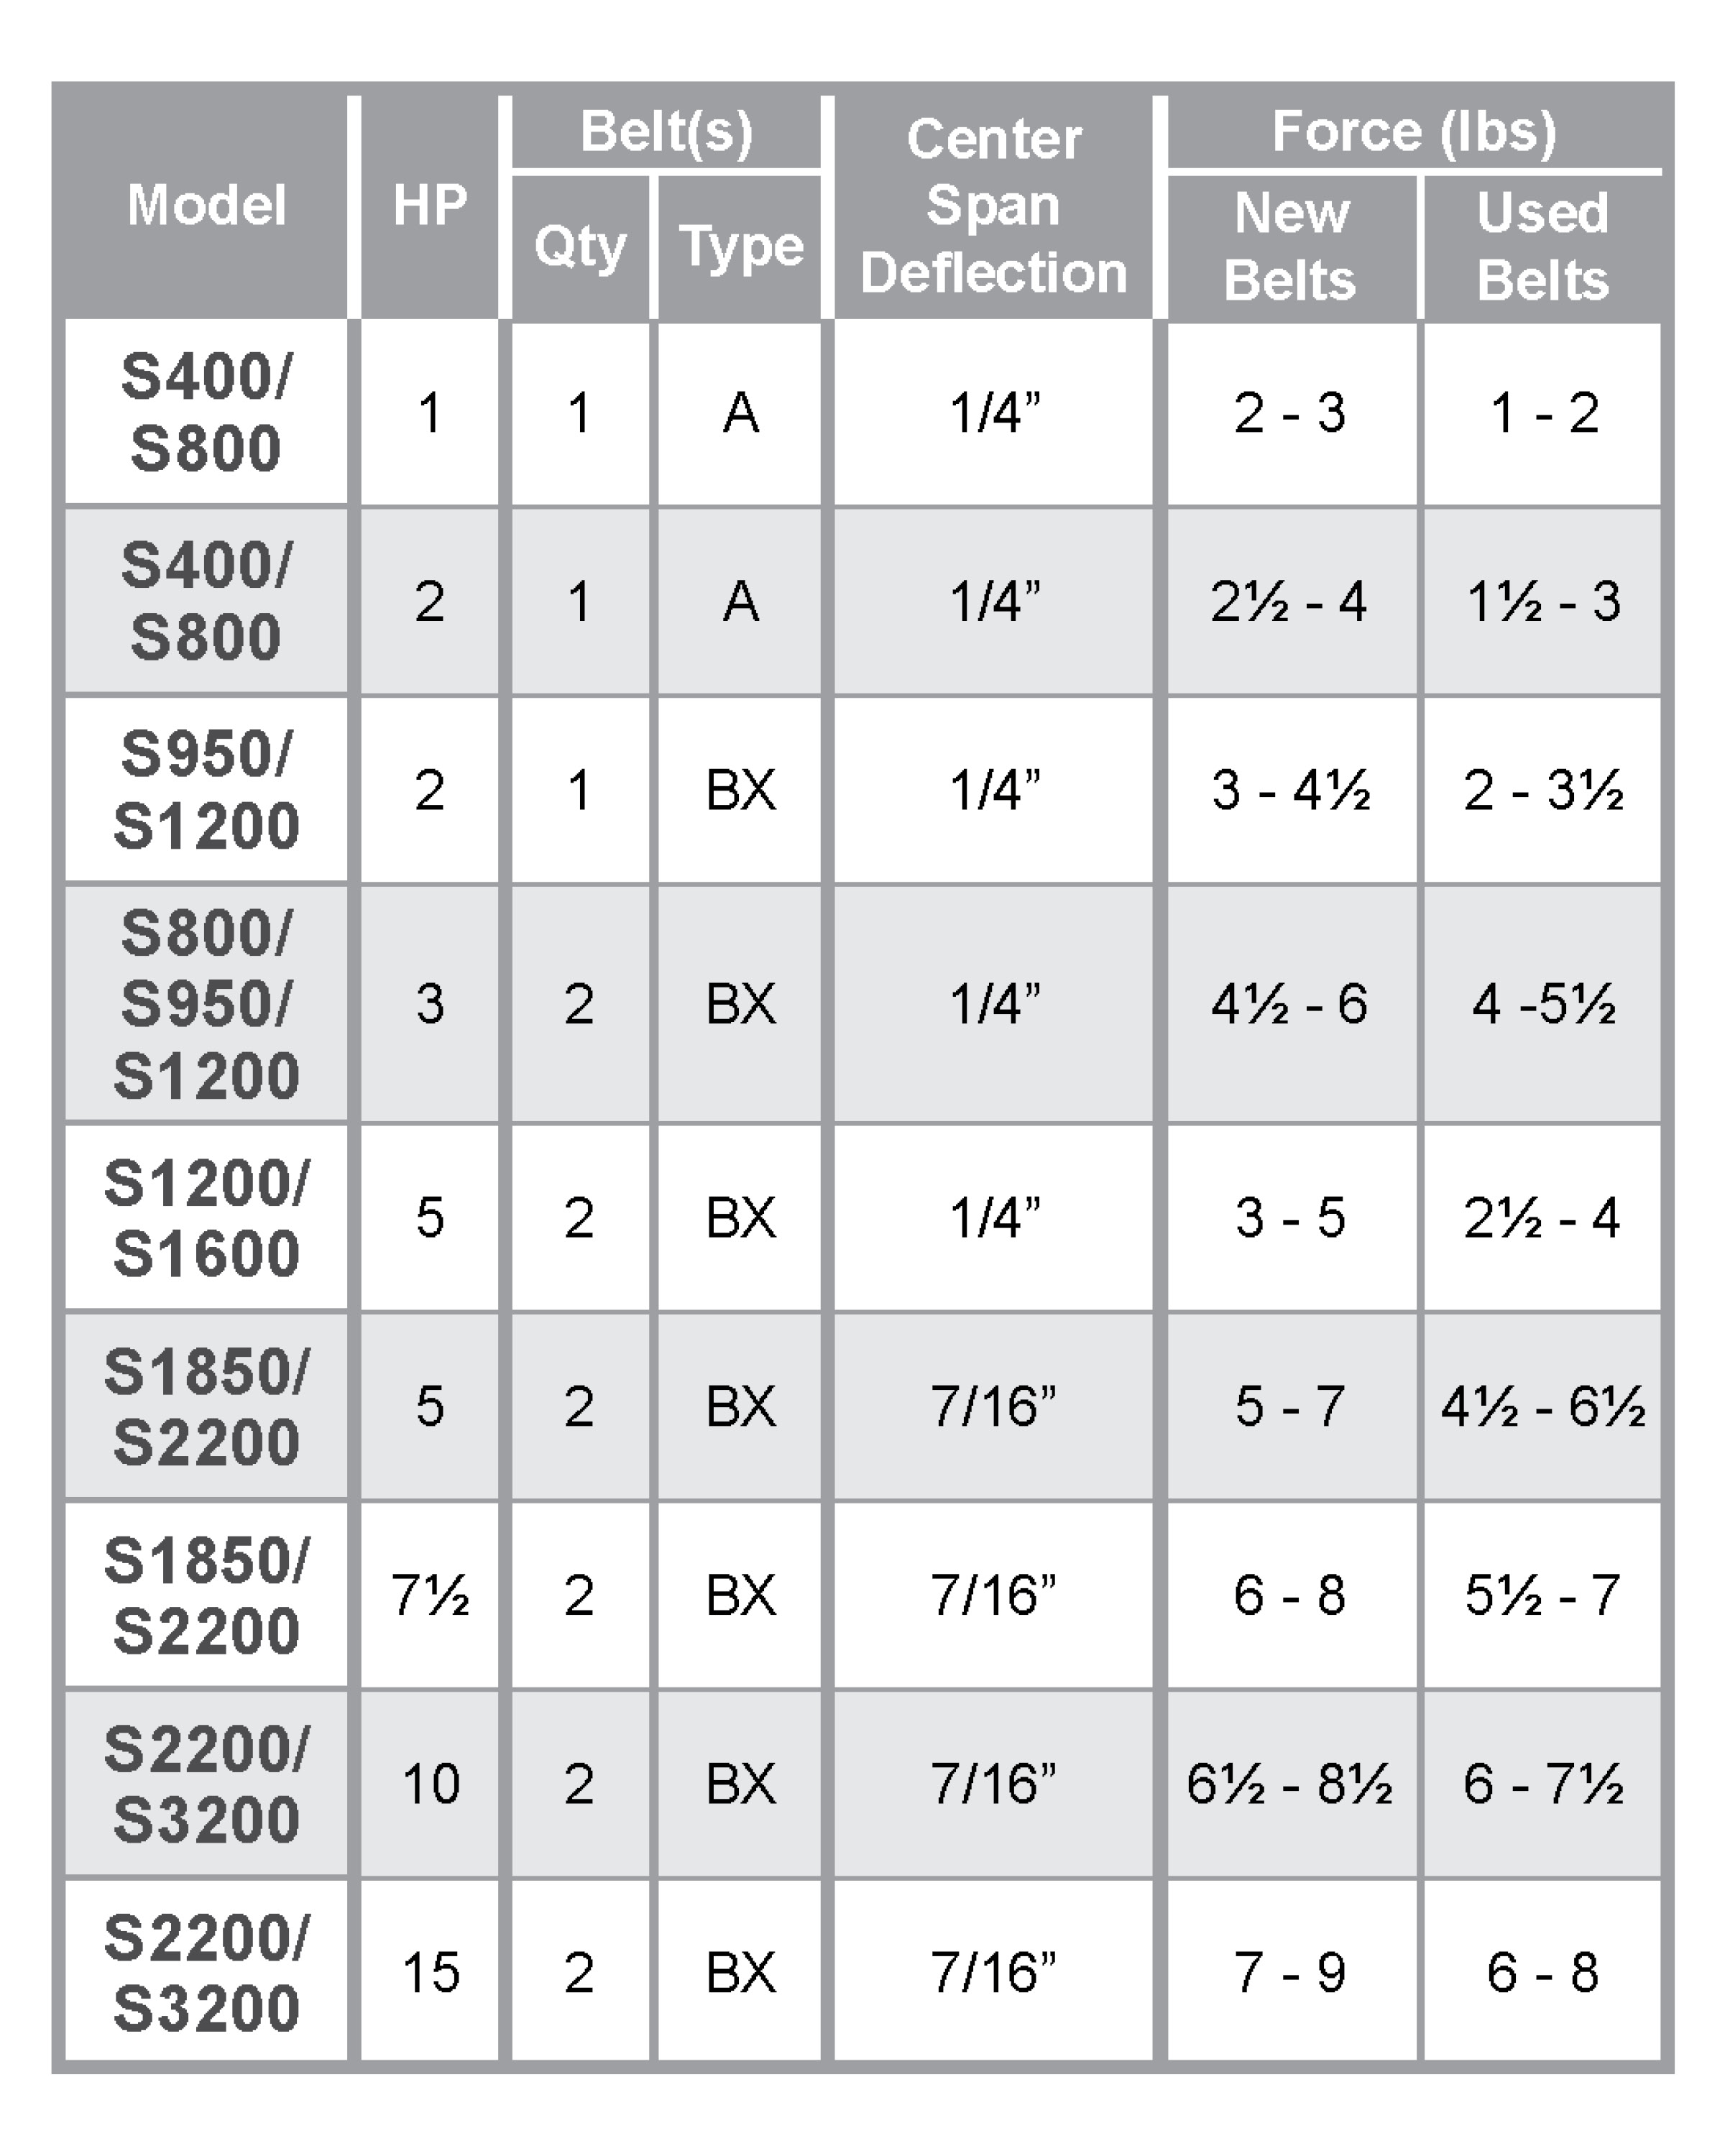
Check the belt tension and inspect for wear: If the belt is too tight, it can prematurely wear out the bearings and the belt. If the belt is too loose it can slip or squeal. Periodic belt adjustments may be required.
Using a Browning Belt Tension Checker and straight edge, verify proper belt tension according to the following table:
Check the blower wheel: Examine for accumulation of dust on the blades. These surfaces must be kept clean.
Cycle the unit on and off in all modes of operation: This ensures components are working per specifications.
Check DC voltage on modulating valve to ensure unit is not stuck in High or Low fire modes.
Burner Cleaning: The burner is for the most part self-cleaning, but if the application is extremely dirty or dusty it may become necessary to periodically clean. For steps on how to clean the burner, reference our tech manual, page 82.
Inspect Flame Sensor: Remove and re-install to ensure corrosion doesn’t form within threads. A steady reading between 2.0 and 6.0 µA should be verified. If reading is low, clean with Emory Cloth and plan to return in the near future to replace.
Inspect hot surface ignitor: Replace if degradation is apparent.
Check the discharge temperature: Use a wired thermistor at the mixing box and calibrate the system if necessary.
Inspect the control panels: Look for any loose or frayed wired connections and make sure all connections are tight.
Perform a gas valve leak test: This verifies the integrity of the valves.
All relief vents on the gas controls should also be checked for blockage. In general, if the voltage to the coil is correct, sluggish valve operation, excessive noise, or leakage will indicate that cleaning is required.
Verify that the manifold differential gas pressure matches the nameplate: It is extremely important that this is set up properly. If the manifold pressure is incorrect, the heater temp rises, and its efficiency will be affected.
Check the calibration of digital thermostats: Press the up arrow and hold it; the display should show 0F. If not, the calibration may have been adjusted to show a warmer or cooler temperature than desired.
Our application-focused engineering team & your local rep collaborate closely for facility fit and system design. Our customer service group can deploy for training, troubleshooting or startups – whatever it takes for your project to be a success. If you ever need to get in touch with a Cambridge expert, don't hesitate to reach out!